Three Strategies for Creating a Maker Space in Your School
Please note: this article was originally published in 2018. Updated 6/2023.
State of the Art
Maker Spaces are popping up all over the world. The term Maker Space can mean many things, but typically describes a physical space meant to facilitate making and/or fixing things.
Initially, these types of spaces were mainly found in larger cities and offered monthly memberships for adult hobbyists, artists, and tinkerers: Pumping Station: One (founded in Chicago in 2009) and NYC Resistor (founded in NYC in 2007), for example. Today, there are Maker Spaces that host children’s birthday parties and summer camps. STEM (Science, Technology, Engineering, and Mathematics) curricula has been lauded by education experts as an integral (and often missing) aspect of education; schools across the world are rushing to build and staff their own Maker Spaces.
While many schools have the space and resources to allocate to building a large Maker Space, many do not. This article will provide two low-cost and flexible alternatives to large Maker Spaces. For those with the resources to build a full-room Maker Lab, I’ll provide some ideas and guidelines that work well. I’ll also discuss best practices that can be applied to any type of innovative learning environment.
What Makes a Great Maker Space?
The best Maker Spaces address all of the following:
- Access: Is the Maker Space designed and equipped to serve multiple ages, a variety of learning styles, and groups that are traditionally underrepresented in design, engineering, and technology?
- Traditional *and* Emerging Technologies: Does the Maker Space feature traditional tech (e.g. sewing machines, hand tools, soldering irons) as well as emerging technologies (e.g. Virtual Reality, 3D Printing, Robotics)?
- Purpose Driven Technology Use: Does this Maker Space promote tech for tech’s sake, or does it teach students and teachers to choose the best tool for the job? It’s easy to privilege the latest and greatest technologies — they are exciting and new. However, sometimes a pencil and paper are the best tools for the job. Sometimes, PowerPoint is the tool needed. Other times, it might be 3D modeling and 3D printing. The best Maker Spaces teach learners to discern between resources and choose the best tools for their creative goals, research, and curiosity.
- Perpetual Learners: Are the adults who staff/teach/support the Maker Space perpetual learners? Do they learn alongside the students? Are they brave enough to say “I don’t know” out loud so that they (and their students) can go find out?
- Gimmick-Free: Are the resources in the Maker Space tools or gimmicks? Unfortunately, the EdTech world is full of gimmickry. Gimmicky EdTech resources often have a lot of sparkle and flash, while offering little educational value or substance. So how does one discern between a tool and a gimmick? A few probing questions can help: How does this resource supplement or complement the learning objectives? Does this resource have a lot of distracting features, which aren’t related to its stated purpose?
One Size Does Not Fit All
In an ideal world, each organization would have a large, vacant space to re-purpose as a Maker Space. In the same ideal world, organizations would have unlimited funding to acquire tools and hire staff for their Maker Space. However, we all know that in most organizations — especially schools — space and money are two of the top three things that are scarce (time is the third). With all that in mind, I’ve outlined three scenarios for creating an effective Maker Space for your school. While the scenarios I describe are geared toward schools, I have seen each one of these strategies work in design studios, traditional laboratories, community art centers, etc.
A Maker Cart is a great choice for many organizations. Of the three options, this is the least expensive. Portability is a key benefit of this strategy. Since resources are portable, making can be decentralized. Decentralization of resources means that teachers can use the Maker Cart anywhere. Learning can happen in a library, hallways, outdoors, or anywhere in between.
Before we get to the pros and cons of the Maker Cart, here are a few cart options to get started:
Pros:
- Low initial setup cost.
- Portability means a variety of environments can support making. Maker resources can be combined with other classroom materials.
- Home Court Advantage: since teachers can check out the Maker Cart to use in their classroom, they naturally will feel more comfortable. Students are less distracted than they would be when traveling to a room dedicated to making.
- Easily expandable: schools can acquire additional Maker Carts as needed or when funds are allocated.
- Widely configurable: rather than a mixed-use cart as detailed above, carts could be configured for specific disciplines. Schools could build a 3D printing cart, a textile arts cart, an electronics cart…
Cons:
- Limited tool options: the physical limitations of carts (physical dimensions and maximum supported weight) means that the range of possible tools and resources is more limited than the other options we’ll discuss.
- Resources must be set up and put away before and after each use.
- Work areas are limited to what’s in the space in which the cart is currently located. For example, if students are soldering a circuit, classroom desks are likely not the most ideal surface for molten solder to drip onto.
- Lack of multiples can be very limiting. A Maker Cart will generally only support a maximum of a few of each tool. This can be problematic when an entire class wants to 3D print or do machine sewing.
What’s on the Maker Cart?
A: Most pushcarts can be modified to become a Maker Cart. As mentioned in the pros and cons list above, overall weight capacity should be considered when planning for your Maker Cart. Pegboard segments can be cut and attached to any side of the cart, which provides easy storage and access to hand tools and accessories. Heavy-duty, large wheels are preferable to support weight and provide a means to cross floor thresholds or uneven surfaces.
B: Bee-Bots, Blue-Bots, and Pro-Bots are fantastic, engaging, and durable resources for teaching computer science. Unlike many robots intended to teach computer science to children, Bee-Bots, Blue-Bots, and Pro-Bots can survive multiple drops, crashes, and falls. Bee-Bot has a range of curricula and accessories that support learning, and even preliterate students can explore computational thinking with these amazing robots.
C: Soldering Irons are used to melt solder to join electrical components. Although the tip of the soldering iron gets very hot, a variety of ages can learn to solder and design circuits.
D: Sewing Machines are the 3D printers of their time! Initially, threading a bobbin, adjusting tension, and controlling pedal speed can be challenging for students and teachers, but it’s easy to attain proficiency with machine sewing. Students feel empowered when they make even the most rudimentary creation with a sewing machine, whether it be a pillow, puppet, or garment.
E: VR Headsets. Alas, Google Cardboard has been discontinued, and there really aren't many easy-to-use and easy-to-develop-for alternatives. Many schools are happy with Oculus Quests, but keep in mind that managing Meta accounts for students can be a frustrating issue.
F: 3D Printers have become synonymous with the Maker Movement. 3D printers are a great way to make things that no longer exist or things that don’t yet exist. There are LOTS of 3D printers to choose from, not only brands and models but also 3D printing methods. I generally recommend a Fused Deposition Modeling (FDM) printer for schools. FDM printers lay down layers of melted filament (plastic for 3D printers) little by little until the entire 3D model is complete. I am a big fan of Prusa printers.
G: 3D Printer Filament is the plastic material 3D printers melt and extrude to produce 3D prints. Modern 3D printers can print in a variety of materials, such as nylon, ABS plastic, and PLA plastic. I prefer PLA as it’s derived from corn, safest to be around while the 3D printer is printing, and very recyclable (for all those not-quite masterpieces). Most people are concerned about the cost of filament, but most 3D printing slicing software (the tool one uses to prep a 3D model to be printed) uses a honeycomb interior to provide structural integrity and save on filament.
H: Traditional Hand Tools are easy to forget about as we plan our Maker Space. After all, most of us have some in our homes and they aren’t featured as prominently in EdTech circles as drones and 3D printers. However, traditional hand tools are a powerful medium of creation and are also a key aspect of fixing and maintaining other tools.
A Maker Wall is another inexpensive, easy to build option for schools. Utilizing a workbench with storage, a Maker Wall is secured in one place. Like the Maker Cart, it’s easy to expand the Maker Wall as needs and/or funds grow. Many schools opt to build a few Maker Walls side by side, increasing both the work surface and storage capacity. In addition to the Maker Wall, schools can paint an adjacent wall green to do chroma keying (green/blue-screening) for video production. Chroma key paint can cost as much as three times as much as regular interior house paint, but regular house paint can be substituted with good results — as long as you choose a flat finish.
Here are a few other great options for the base of your Maker Wall:
Pros:
- Storage! Extra shelves can house multiples of certain tools (e.g. 3D printers). Drawers can hold supplies or tools and can be subdivided if needed.
- Depending on the style of the shelving system selected, a workbench surface can be included.
- Flexibility — easily expandable and customizable.
- Whereas the Maker Cart maximizes portability, the Maker Wall is a great addition to an existing space (e.g science labs, art rooms) or can be installed in a hallway or alcove. Some schools choose to use a corner; one wall of the corner for the Maker Wall and the other wall for video production.
Cons:
- Not portable. A school gains work surfaces and storage with the Maker Wall but lose portability.
- Semi-permanent space required: for safety’s sake, it’s best to secure the Maker Wall to the wall on which it is placed — this prevents tipping and gives a firm, steady work surface when using tools that require pushing or pulling.
- Limited workspace — a Maker Wall adds workspace and storage where there previously was none but is still limited to one or two students using the workbench.
What’s on the Maker Wall?
We covered A-H while talking about the Maker Cart:
I: Small parts organizers are invaluable for LEDs, screws, nuts, bolts, resistors, capacitors, batteries, and basically anything that is small or easy to lose.
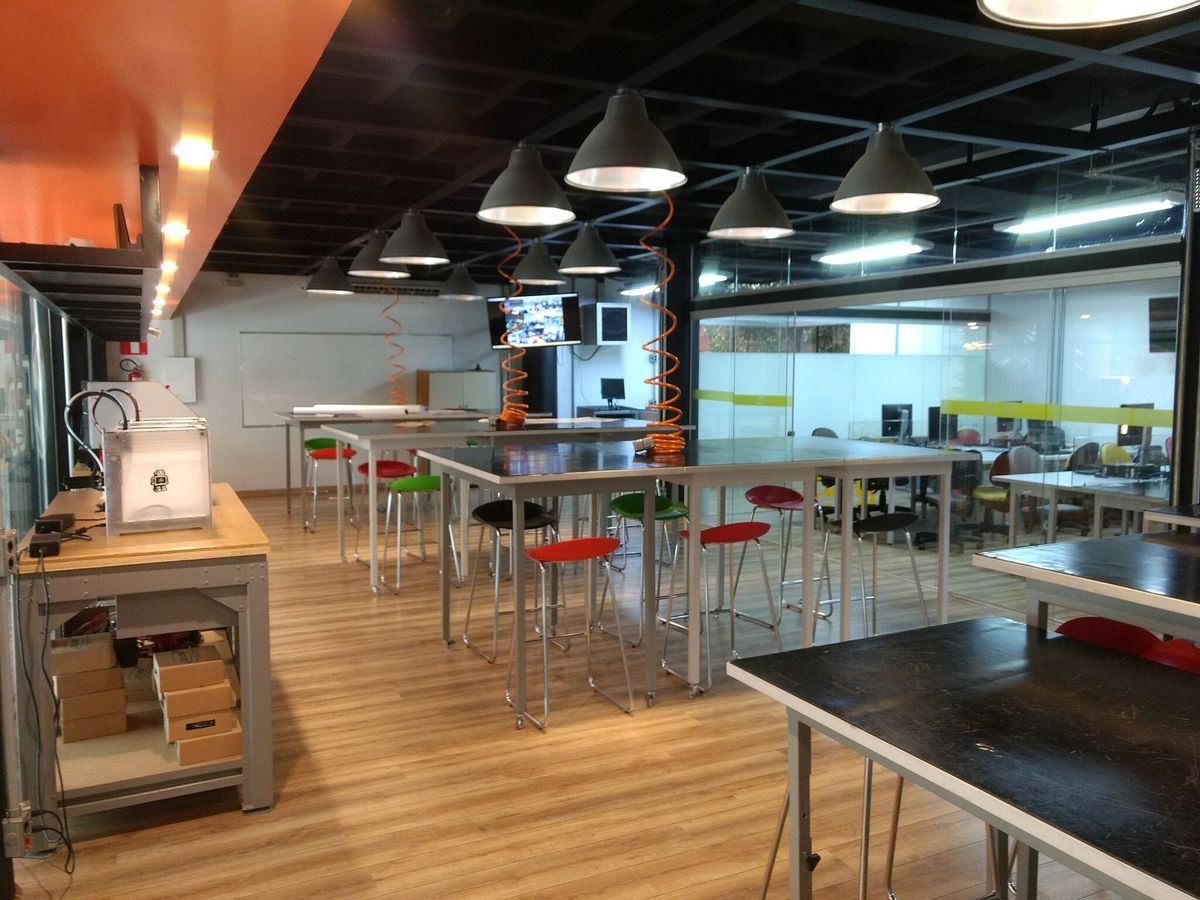
Maker Lab: When You Have the Resources for an Entire Room or Building
The Maker Lab is the ultimate Maker Space. A Maker Lab can support a large group of learners working in multiple modes and disciplines. Requiring the largest space allocation, a Maker Lab can also be the most costly to equip. Many schools elect to build to suit for their Maker Space or Innovation Lab, but many types of rooms and spaces can be re-purposed as a Maker Space — classrooms, hallways, and even large supply closets!
Pros:
- Centralized location for classes and projects.
- Depending on size, the Maker Lab can facilitate entire classes.
- Possibility for separate, specialized areas. This is especially advantageous when one can designate a discrete fabrication room that separates machines and tools that make dust, loud noises, or fumes from dust-sensitive electronics.
- Setup is quicker and easier — since each machine has its own area, projects can be left to dry or finish. For example, a 3D print can continue to run after the class period ends. In the case of the Maker Cart, projects must be done before the cart can be reset and moved to a different classroom or area.
- Room for lots of different activities, machines, and supplies.
Cons:
- Space: A larger, dedicated space is required.
- Cost: This option can be considerably more costly than the Maker Cart or Maker Wall.
- Depending on size, a Maker Lab may be limited to one group of students or teachers working at a time.
What can I put in a room-size Maker Lab that won’t fit on a cart or wall?
Since several items were covered in previous sections, we’ll focus on what a Maker Lab could feature — particularly things that might not work with the Maker Cart or Maker Wall options.
HTV Vive Virtual Reality (VR) Sets | The HTC Vive is a fantastic and relatively low-cost VR system. In addition to a tracked headset, the Vive includes two powerful and beautifully designed controllers.
More Sewing Machines! | One sewing machine is great, but several are better. Due to the low cost of good entry-level machines, it’s convenient to have more than one for students to use. Having one heavy-duty machine (for thicker materials such as canvas or denim) and one programmable machine (for automated designs or lettering) can also be great resources as students become more advanced sewers.
Dress Forms | A dress form is a free-standing tool that simulates the curves of a human body on which to build garments. They come in both static and adjustable styles.
Sewing Storage | More sewing and more complex projects leads to a need for more supplies. Shelving units with lots of cubbies in a variety of sizes provide ideal storage for in-progress student projects, fabrics, and miscellaneous supplies.
More 3D Printers! | Having more than one 3D printer means that more 3D prints can be made in a shorter time (it also means more maintenance will be needed). While having several 3D printers isn’t required, it’s important to be mindful of the bottleneck 3D printing can cause. In general, 3D printing is slow! With one or two 3D printers, a class of 25 students can certainly all print unique objects — just over a longer time frame than with more 3D printers.
Lumber Storage | Storing both lumber and scrap is an important aspect of a neat and safe Maker Space. I recommend at least one vertical lumber storage cart.
Inventables X-Carve CNC | A CNC (Computer Numerical Control) router is a great tool that fills the gap between what a 3D printer can do and what a laser cutter can do. A CNC router uses a subtractive process to create 3D forms. Inventables X-Carve is a high quality, easy to use CNC machine.
Work Benches | There’s never enough workspace! A workbench (or several) provides extra workspace and/or desk space.
Soldering Irons and Electronics Supplies | Children can start learning electronics at any age, but I recommend starting at three years old. Beginning with Snap-Circuits, students can progress toward using soldering irons and raw electrical components by 4th or 5th grade.
Table Saw | A table saw makes straight cuts and is an efficient tool for carpentry. Safety issues are always a concern with power tools, so it’s important to get adequate training before ever attempting to use one. I like this Grizzly 10″ Table Saw.
Dust Collector | Dust can be a major issue not only for the health of those using the Maker Space but also for machines that might be sensitive to dust. ( Grizzly 2HP Dust Collector)
Belt/Disc Sander | A belt/disk sander like this Grizzly Combination Belt and Disc Sander can speed up finishing and save time.
Mitering Saw | Mitering saws such as this Milwaukee Dual-Bevel Compound Miter Saw can be safer to use than a table saw or bandsaw. They make compound cuts easier.
Band Saw | A band saw like this Grizzly Ultimate 14″ Bandsaw is another handy tool. It can make curved or complex cuts easy.
Drill Press | While a hand drill and driver are must-haves, a drill press guarantees perfectly perpendicular drilling. ( Grizzly 12 Speed 20″ Floor Drill Press)
A Laser Cutter | Laser cutters are truly amazing machines. They are handy for cutting cardboard, most fabrics, card stock, and paper. Boss Lasers offer great value, high quality, and the power to cut through thick materials. However, the maintenance required by Boss Lasers means they may not be the best choice for all makers. Smaller laser cutters like a Glowforge might be a better fit for makers who don’t have the time or training to maintain a larger laser cutter.
Last But (Certainly) Not Least
The Single *Most* Important Aspect of Any Maker Lab
We discussed three strategies for building an effective Maker Space in any school, design studio, laboratory, or other organization looking to get started with making and rapid prototyping. We covered a wide array of useful and engaging tools that work for varied learning styles, subjects, and ages. However, the single most important aspect of any effective Maker Space is the teacher. Hiring, training, and supporting a passionate educator to facilitate learning is the #1 key to success. All too often, I visit schools and hear that a teacher has been asked to staff a new Maker Space in addition to a full teaching schedule. Or a librarian must organize and teach in a library full time, while also navigating a new Maker section of the library. Schools that have successful Maker Spaces have selected a passionate educator (or several) to focus on the Maker Space. These schools have given these educators the time, space, and training necessary to be successful.
So, if you can only focus on one aspect when planning for your new Maker Space or while thinking about how your existing Maker Space can be more successful, start with a teacher.